The Sweet and The Sacred

The Sweet

bunny square.jpg

As I write this, I’m in a coffee house called “The Hive”at Roehampton University in London. (My husband brought me along on a work trip:) Traveling in the U K. is easy because there’s no real language barrier but there are things I’m still figuring out I think I just tipped the gal behind the barrista the equivalent of $5, oops!) Anyway, back in “The States,” I ran across these bunny ear cupcakes on a website called “Your Cup of Cake” and had to put my 4 ingredient spin on them!

bunny final.jpg

Cupcakes:

A boxed cake mix (carrot, white or lemon is good - strawberry looks cute but tastes artificial)

regular cream cheese

eggs

Icing:

1 and 3/4 pkgs. of regular cream cheese

1 & 3/4 cup of powered sugar

Bunny Ears:

Regular sized marshmellos (They now make pink ones as well:)

Pink sprinkles

Preheat oven to 350

Step 1: Follow the box directions for making cupcakes except substitute softened cream cheese (microwaved about 20 secs. in a bowl) in place of the oil/butter required. (Michael’s has precious paper cupcake holders!) Note: Whenever baking anything, always slowly open your oven so that your creations don’t cave in. Another past oops!

Step 2. For the icing, soften the cream cheese just slightly (15 to 20 secs for the whole block) in a mixing bowl then blend in the powdered sugar using a hand mixer until smooth.

Step 3. After the cupcakes have cooled, ice by hand or better yet use a pastry bag and tip - so fun! (You can find these inexpensively at Michael’s or your regular grocery store. You can also cut the tip off of a plastic bag and use that.)

Step 4. For the bunny ears, cut chilled marshmellos diagonally (see 4.a below) then dip each one sticky side down into sprinkles. (4.b below) and place them on top of each iced cupcake.

marshmellow cut.jpg

Step 4. a

marshmellow dip.jpg

Step 4. b

The Sacred

cross sideways.jpg
cross supplies.jpg

All the bunny rabbit stuff is super fun, but Jesus got there first. My good friend Debbie Hunter got one of these succulent crosses for her B’day, and I thought it would be great to make them to celebrate Easter and the rssurection! Here’s what you will need:

A moss covered cross. (You can get these for $6.50 on-line at the Wreath Shop or on Amazon (brown moss) for $11.00 - They both take about 1 week to arrive so you best get ordering:)

Lots and lots of small succulents (Walmart has really good prices - I ordered mine on-line.) You will want around 30 succulents cuttings (like the ones in the picture opposite).

Scissors

Old fashioned hair pins (not bobby). These seem to work better than the silver floral pins.

Opt. glue gun and sticks

Step 1. Clip a bunch of succulents leaving a half inch or so if possible of stem. When needed you can remove some of the leaves at the base of the clippings to create more of a clean stem. (if you are working with small individual succulents and can get some of their roots, that is even better.)

Step 2. Use scissors to punch holes in the moss to make a place for each succulent stem.

Step 3. Secure each succulent with a hair pin doing your best to go around the leaves without puncturing them. The smaller clippings only need one hairpin.

Step. 4 You can layer the succulents. For example, it looks really cool when you use mini succulent buds in the center of a larger succulent. You can use hair pins on top succulents or a glue gun to secure them. Glue guns also work great to reattach leaves that have come off.

*You can hang your cross by simply punching a hole in the back of it and putting it on a nail.

** The cross will last longer if you keep it outside in indirect sunlight (or even just at nigh)t and lightly spray water all over it at least once a week.

*** If the moss turns brown and you don’t like that look, just cover all the brown with more succulents.

Cross+regular.jpg

Looking Back

Last year we did these precious Bunny Napkin Folds - Total crowd pleasers and easy to do!

3 bunnies pic final.jpg

Dress It Up With A Bow!

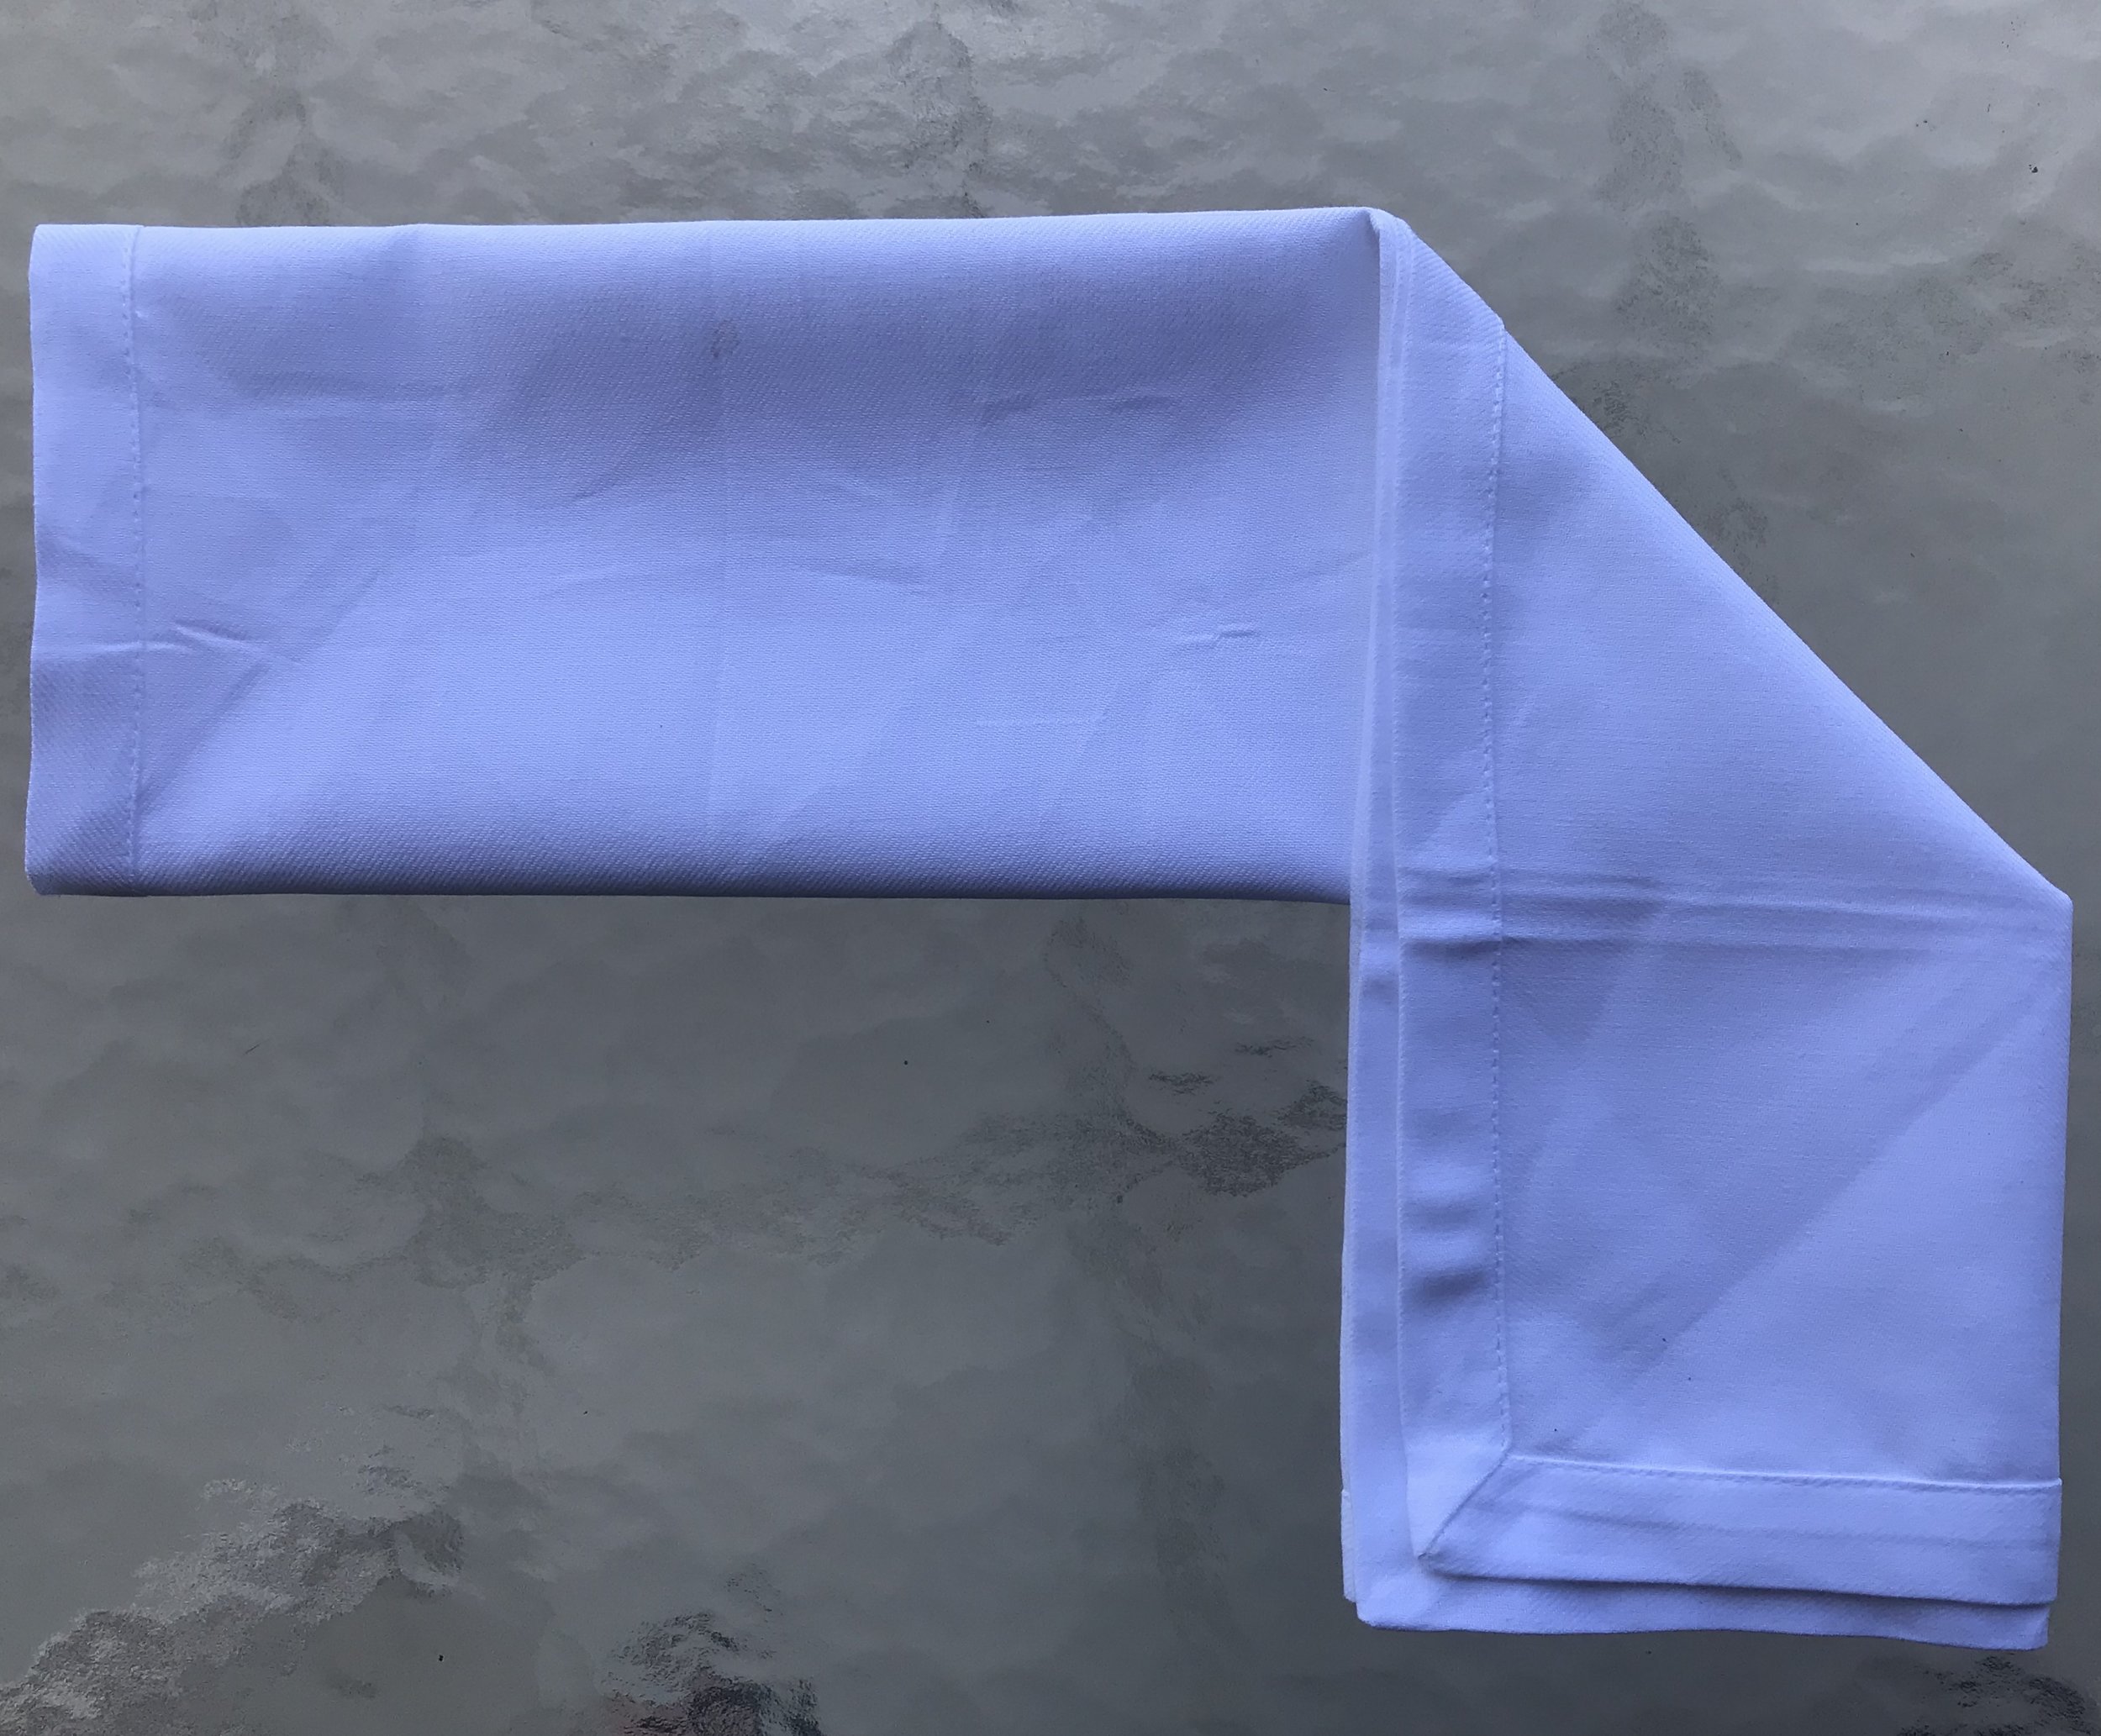
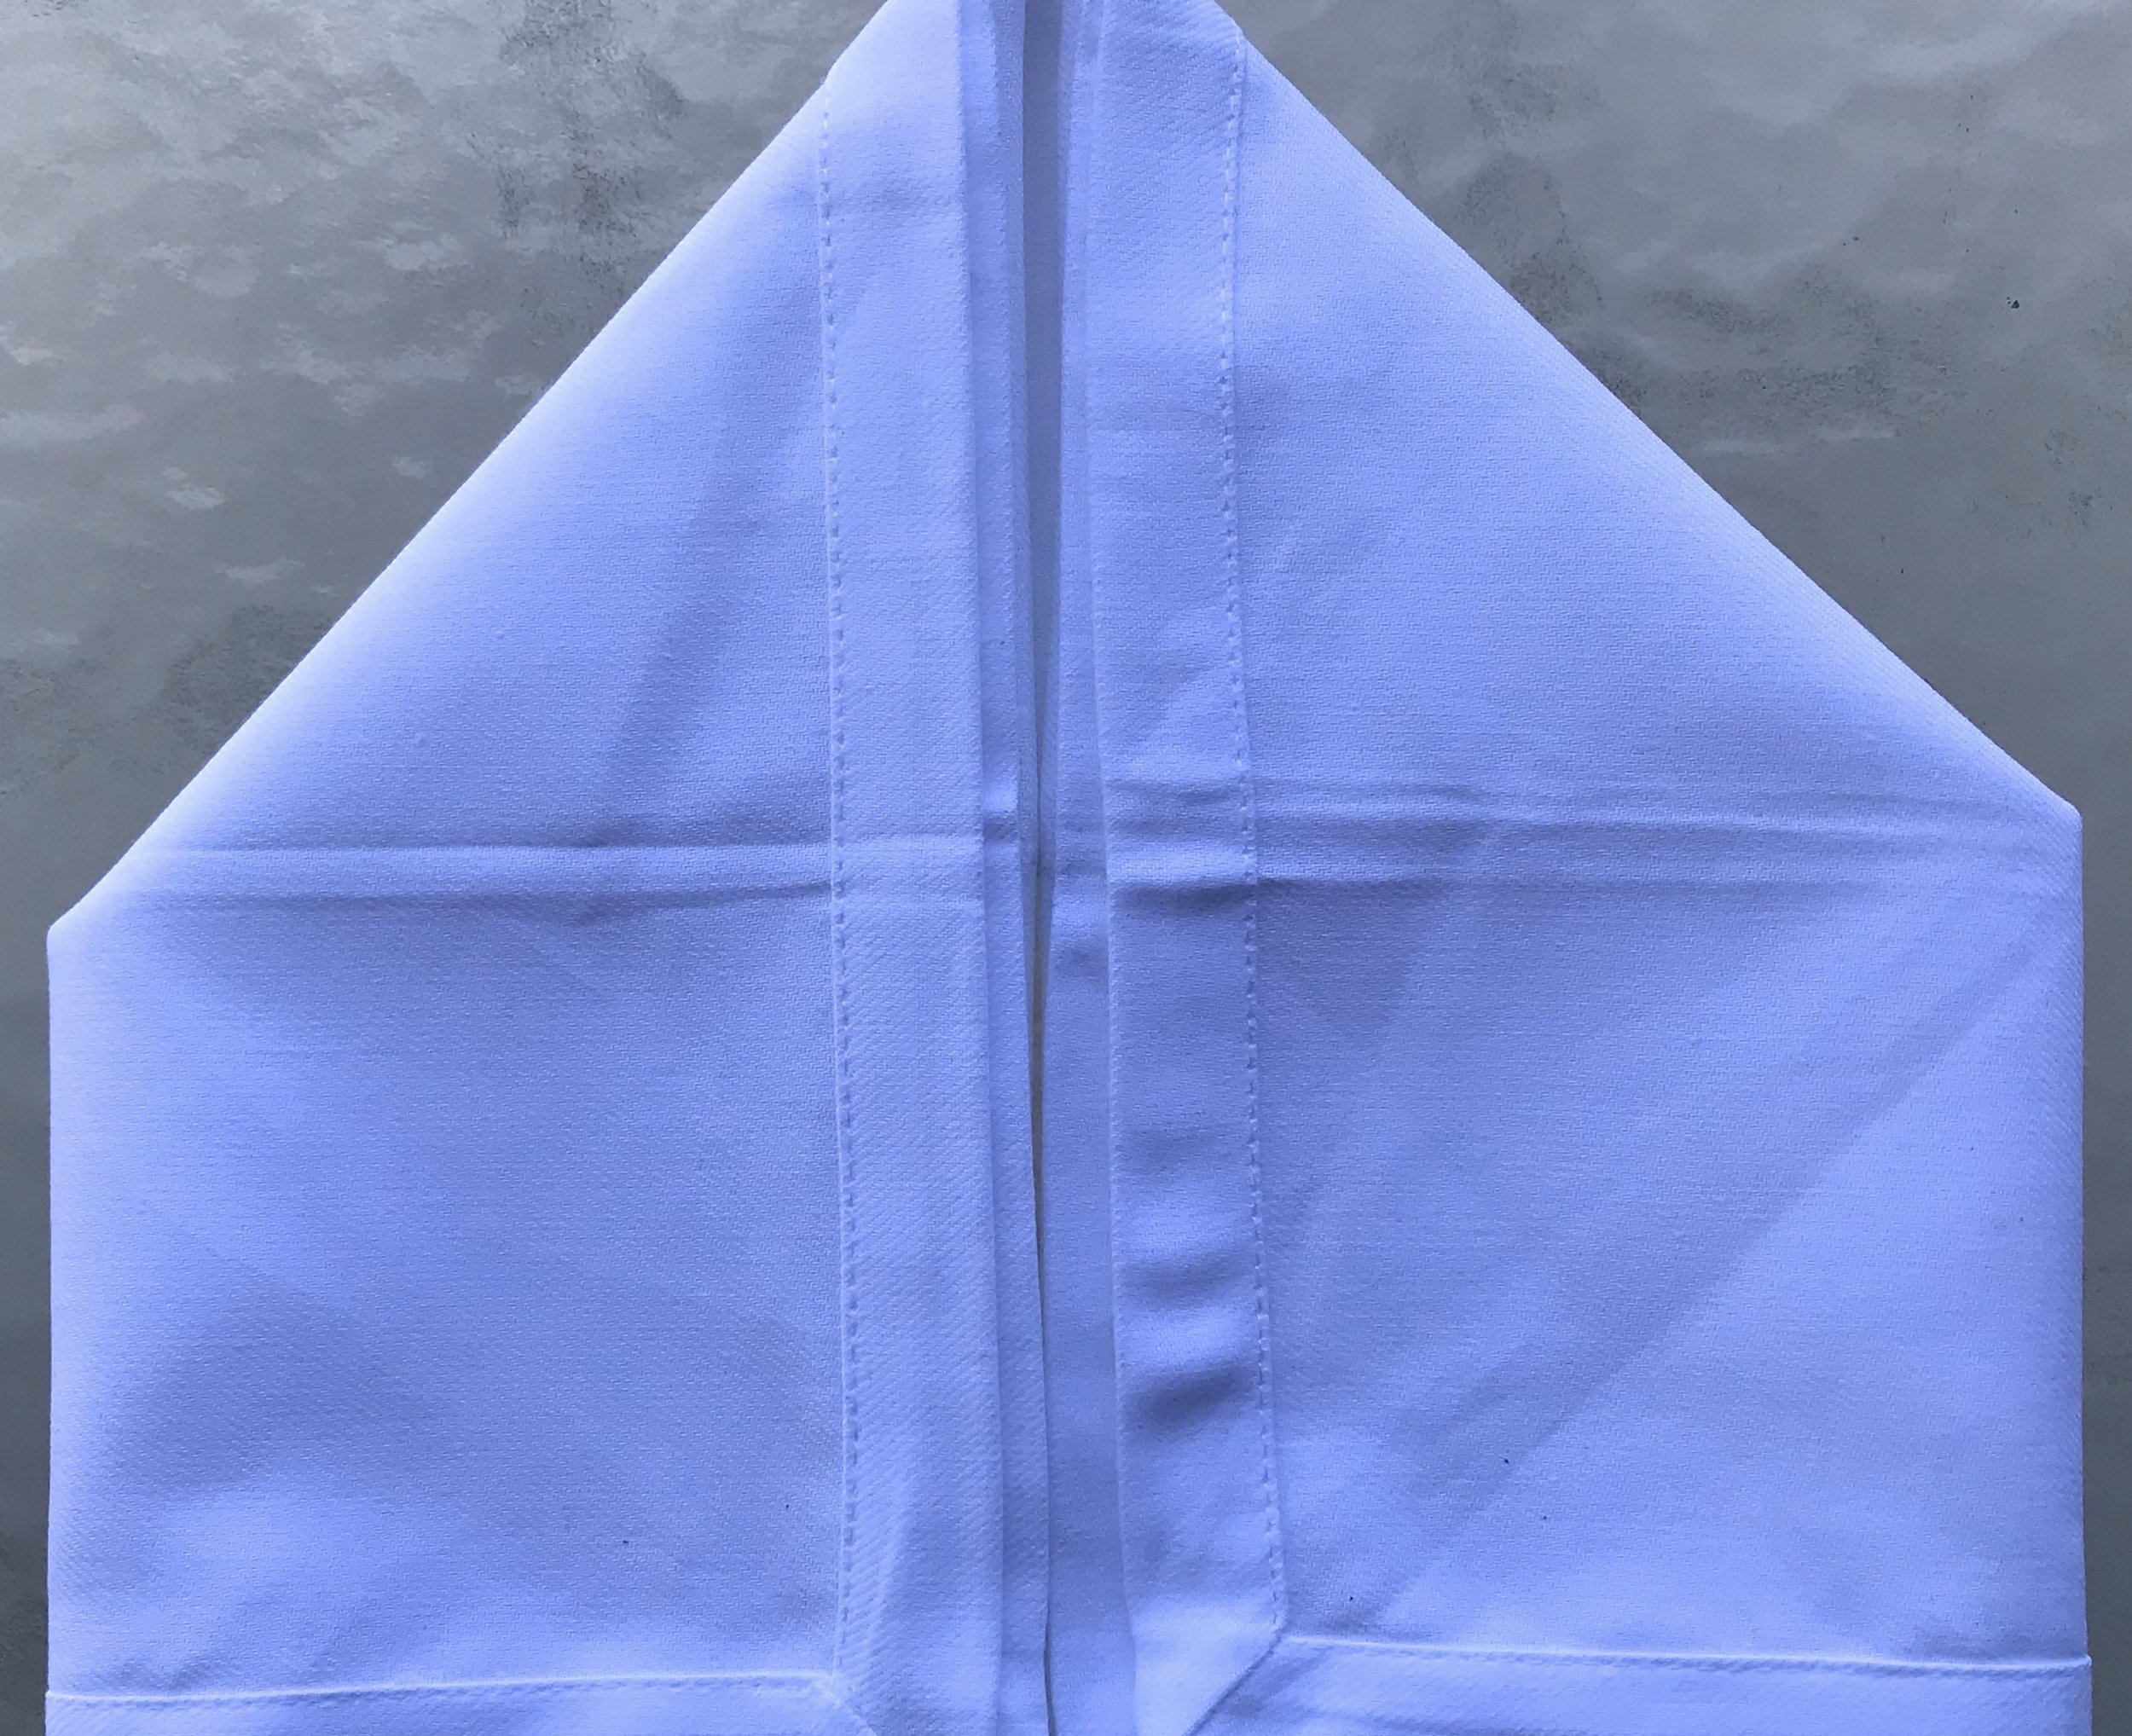
The bow napkin fold is one of the easier folds, but it looks no less special. It's perfect for every kind of party from baby showers to dinner parties. You will need a cloth napkin and a 12 inch ribbon. Here are the steps: 

Step 1. Take a pressed napkin and turn it so that it looks like a diamond with the bottom pointing towards you.

Step 2. Bring the bottom point up to the top point, so that it makes a triangle.

Step 3. Fold the top points down almost to the bottom edge.

Step 4. Then fold the top down again to meet the bottom edge.

Step 5. Fold the right side in a third of the way.

Step 6. Then fold the left side in a third of the way.

Step 7. Slide a ribbon under the napkin.

Step 8. Tie the ribbon tightly

Step 9. Turn it over and you've got your bow!

Abraquadabra

I was over at my friend's Michael and Marcy's  in Laguna Beach, and I remarked at how beautiful their garden was. Right there and then Michael cut me some stems way down at the base and told me to just stick them in the ground at my house and watch them grow. The one that took was the Chocolate Geranium. I was amazed! It was like magic!

Recently, I talked to another friend, Dale, also from Laguna Beach. He said the thing that would help the process would be to plant the stems in pots, then water them daily for a while. He also said that he does the same with succulents, and once the succulents take he only waters them when he feels like it.

Bring On The Bling

Years ago I was at John Noyes Jewelers on Balboa Island, and I remarked about how sparkling Sheila Noyes's ring looked. She said that every night when she brushed her teeth, she would brush her ring especially the underside. I went directly home and tried it. (With another tooth brush than my own, I might add.) It worked so well that a friend later that day remarked at how shiny it was.

Before

Before

After

The tourmaline "dinner ring" above was passed down to my sister, Virginia, in Atlanta. (Don't ask me why she got the ring and I got nada. Oh the plight of the "middle child".)  Anyway Virginia did exactly as she was told (used a toothbrush and toothpaste to scrub it with all her might) and voila, she has a ring that sparkles and and shines! Try it. You'll be amazed!

Mr. Clean

When I was talking to my good friend Lara Lanfried from Newport Beach about this little trick, she said she uses Mr. Clean. All you do is soak your jewelry in Mr. Clean for a few hours then brush it with a toothbrush before rinsing. I didn't know Mr. Clean even existed anymore, but as you can see below, it does exist and it works wonders. 

Windex? Really?

In order to use any of these tricks on rings you have to get them off first. For me that's quite a feat. Again my jeweler knows the answer: Windex. He has some behind the counter and whips it out whenever he sees me coming. Try it. This is much better than soap because soap makes your ring all dull and of course we don't want that.

Fun Saying

One of my favorite sayings is: "Playing Possum." One time I was cuddled up in bed laying super still. My husband said,  "Are you okay?" I laughed and said, "I'm playing possum". He had never heard that saying! I love all the color in the speech of a Southerner. One of the most fun things about visiting my friends and family in Alabama is hearing the expressions that naturally come tumbling out of their mouths.


How To fold A Fitted Sheet With Elastic All Around

fitted sheet.jpg

Very few people know how to fold a fitted sheet and most of us just roll them up and throw them in a closet. I did a demonstration video about two years ago on how to fold a fitted sheet when there is elastic in just the corners. I promised that one day I would do an an additional demo that added two steps in the beginning that are essential when working with sheets with elastic all the way around. Here goes:

What Are Your Colors? (Part 1)

An ice age ago, there was a craze about "Getting Your Colors Done" to see if you were an Autumn who looked best in warm, muted colors, a Spring (warm, clear colors), a Summer (cool muted, colors) or a Winter (cool, clear colors.) Surprise, surprise I got trained in Color Analysis.  I probably have a hundred color drapes stuffed into the back of my closet. So grasshopper, I give you all my color knowledge. 

Most people don't know "their colors" even movie stars (or their designers that is), and as a result much of the time we walk around looking far from our best. Below I have examples of the difference it makes when we wear the right colors.

Do you see how pale Cate looks in black? To top it off someone put orange lipstick on her. Only Autumns and Springs should even think about wearing orange lipstick! 

On the other hand, she couldn't look lovelier in Summer's soft mint. (BTW I want those earrings:)

Winter's hot pink is not meant for Amy.  Whenever the color stands out more than the person, you can pretty much assume that the color ain't right. This is the case with Amy. 

Here Amy looks radiant in Autumn's orange. Very few people can pull off orange, but boy can she! The orange doesn't take away from her, instead it compliments her coloring.


J. Lo. is beautiful in just about anything, but I'm sure you can see that yellow makes her look yellow.

On the other hand look how ravishing J. Lo. is in ruby red. Everyone but Winters are over-powered by a color this strong.

Gorgeous Rooney's designers didn't do her any favors by putting her in Autumn's ecru. She looks totally washed out. To top it off they put her in a dress that's more poultry than dress.

Miss Winter actually looks better in her "Girl With The Dragon Tattoo" get up. Who would have thunk?

Next week I'll be posting "What Are Your Colors?" (Part 2). We will talk about clues to determine what season you are and look at the palettes for each of the four seasons. 


What Are Your Colors? (part 2)

As we talked about last week, there are certain colors that go along with each season, and our type of coloring fits into one of the four seasons. We look really good when we are wearing "our colors" and washed out when we aren't. When I was in my early 20s, don't ask me why, but I wore peach all the time. Later, when a color analyst put a peach drape on me, I saw myself in a mirror and it hit me right away how sick I looked. On the other hand, when the gal put a magenta drape on me, I looked half decent.

Here are some clues as to what season you are: Your natural hair color (did I say natural color?) is a really good clue.

Dark Brown or Black Hair - Most Likely Winter

Medium Golden Brown or Medium Red Hair - Most likely Autumn

Ash Blonde or Light Ash Brown Hair - Most likely Summer

Light Golden Brown or Light Red Hair - Most likely Spring

Also the "cool" seasons (Winter and Summer) are more complemented by silver and the "warm" seasons (Autumn and Spring) are more complemented by gold. As a matter of fact the first two drapes that a color analyst would put on you would be a silver drape and a gold drape to see which one complements your coloring. Below left, you will see that Summer (that is her name) is a Summer (how convenient), so she looks smashing in silvery-gray.  On the right side, my daughter, Abbey, who is an Autumn, looks gorgeous in gold.

Finally, if you aren't sure which "season" you are, you can wear a color from one season then on the next day a color from another. First look in the mirror and see what you think, then see how others respond. A response such as "I love that color" is very different from,"YOU look beautiful today!" or "That color makes YOU look great!"

Where Do We Go From Here?

One thing is to wear the colors that are in your seasonal palette (see below.) You may be thinking I like red, but that is probably not my color. Notice that every palette has a red, a dark blue, etc. The difference is that the Winter palette has cool, clear reds, the Autumn palette has warm, muted reds, etc. One important thing to take note of is: Winter's white is stark white; Summer's white is soft white; Spring's white is soft cream; and Autumn's white is ivory. (Sorry, my palette boards look so weathered. It must have rained in my closet.)

Something else you can do is wear the jewelry that goes with your season. Winters and Summers are more enhanced by silver jewelry, and Autumns and Springs are more enhanced by gold jewelry. 

Another thing you can do is take a picture of your palette and use it when you are shopping. If you want an official palette, you can go to the "Color Me Beautiful" website. The website also has makeup for each season.


Winter: Cool, Bright Colors

Summer: Cool, Muted Colors

Spring: Warm, Clear Colors

Autumn: Warm, Muted Colors

Simple But Special

This is the easiest of all special napkin folds, but as you can see from above it still adds a lot to a table. Here's how you do it: 

Take two different color napkins and lay them down so that the bottom napkin shows as well. You then pinch both napkins in the center and lay them down. Take about 2 feet of ribbon and tie it making sure it is loose enough that it can be slid on and off. Napkin rings can be used instead of ribbon. (I don't have many napkin rings lying around, but I have ribbon coming out my ears from doing crafts with my girls.)

easter napkin 5.JPG
simple napkin 4.JPG

Fun Saying

My cousin-in-law, Betty Cox,  told me this one: Instead of saying, that won't work, you say, "That Dog Won't Hunt". The reason this saying is extra funny to me is that my Daddy and all his friends and family hunted on a regular basis. They loved hunting so much that they annually went to Mexico to duck hunt! I'm quite a good shot (I will say so myself.), and I think it's because my Daddy's blood flows through my veins. (Don't worry my California friends. I have only ever shot at targets:)

It's All About the Corners


If you ask 10 people if they know how to fold a fitted, 9 of them will have no idea. My friend, Peggy who is very fun and funny asked, "Don't you just roll them up and stick them in a closet?" Tragically, Peggy is not alone. There are millions of fitted sheets that have been rolled up and thrown in closets.

One day I was making a bed with my sister-in-law, Chris Steckel, and I noticed that she was masterfully folding a fitted sheet. I asked and she showed me how to perform this difficult feat. I will say that after all the practice I've done, my fitted sheets still don't come out perfect, but they look a heck of a lot better than they ever have! Below I have made a video for your viewing pleasure:

Step 1. Put your hands in two corners making sure that the sheet is running lengthwise. Step 2. Put your hands together and flip the left corner over the right. Step 3. Put the two corners in your left hand and with your right hand find the inside bottom corner. Then pinch the inside bottom corner so that you don't lose hold of of it. 

Step 1

Step 2

Step 3

Step 4. With your right hand tuck the inside bottom corner into the the outside bottom corner. Step 5. Bring all four corners together, and again flip the left corners over the right corners. Step 6. Next lay the sheet down on a table or bed and smooth things out a bit. There should be a corner that is entirely elastic on the left that forms what looks like a big upside down smile. Then fold the top of the sheet down about 6 inches. 

Step 4

Step 5

Step 6

Step 7. Fold the bottom all the way to the top. Step 8. Fold the right side to the middle then the left side to the middle. Step 9. Fold the left side over and smooth it down on the top and the bottom. You now have a folded, fitted sheet!

Step 7

Step 8

Step 9

FYI: Folding the type of fitted sheet that has elastic all the way around is a more complicated animal. We will tackle that one another day.


Here's Something That Will Impress Even Your Mother-in-Law (Or Anyone Else For That Matter)

I have always loved sprucing up a table with flowers, but this whole napkin folding thing is new for me. I first thought about it when a few of my friends and I were failing miserably at doing a special napkin fold. I decided I wanted to learn because it makes a table that much more attractive, and it's totally fun! This particular napkin fold is called the French Pleat. It will look great on your Thanksgiving table! 

Two great places to buy inexpensive napkins are at TJ Maxx and Cost Plus/World Market. (Not sure why they have two names.) As you follow the steps below, don't be discouraged if you don't get it down right away. It takes practice, but the result is worth it. 

Step 1.

Step 1.

Step 2.

Step 2.

Step3.

Step3.

Step 1. Take a clean, pressed napkin and lay it down flat on a table. (Seam side down.) Then take the two bottom corners and bring them up to meet the two top corners forming a rectangle. Smooth the napkin down. (You can't do this too much when doing a special napkin fold.)

Step 2. Take the left edge and fold the napkin again to make a square. 

Step 3. One at a time peel back each of the top 3 layers from top right corner down to the lower left corner, leaving the bottom layer in place. (Of course smoothing everything down.)


Step 4.

Step  5

Step  5

Step 6.

Step 6.

Step 4. Take the top layer and fold it back so that it forms a slightly smaller triangle. Then tuck the tip of the triangle under the next layer.

Step 5. Fold the next layer so that it's edge is about 1/8 of inch from the first edge. Tuck in the tip of the 2nd corner as well. The picture below looks very similar to the picture in Step 6, but the top layer in Step 6 is about 1/2 inch away from the 2nd layer. (Clear as mud. Huh)

Step 6. Then take the top layer and fold it so that it's edge is about 1/8 inch from the edge of the second layer.

Step 7.

Step 7.

Step 8.

Step 8.

Step 9.

Step 9.

Step 7. Carefully turn the whole thing over. Step 8. On the right fold in 1/3 of the napkin. 9. On the right fold in the other 1/3. Smooth everything down.

Step 10.

Step 10.

Step 11.

Step 11.

Step 10 & 11. There you have a French pleat. Finally put your knife, fork and spoon into each pouch.

Voila! You have the makings of a very special table.


Bundles of Joy!

Folding a fitted sheet (part 2)

As I mentioned in last week's blog. It is close to impossible using the method I showed you to fold the kind of sheet with elastic that runs all around it. Follow this link and the darling little gal will show you a very simple way to do it!

Bundles of Joy

As you can see in the pictures, there is a super neat way to store a set of sheets. The other day I was getting a set of sheets for my daughter and was dreading finding a set for her that matched. I opened the closet and found a little bundle. I had forgotten all about making it, so I was a Happy Camper! (My very good friend Debbie Trammell taught me how to make these cute little bundles.)

Step 1. Gather a pillowcase and a set of folded sheets. Then you put the first sheet in the pillowcase turning the sheets in a way that they fit best.

Step 2. Put the second folded sheet on top of the other sheet. 

Step 3. Fold the extra room of the pillow case over and tuck it in the little flap of the case.

Fun Saying

I promised when I first started blogging that I would throw out a fun saying every now and then, but I "fell off the wagon". See people from the south automatically talk like that. Anyway my official saying for this week is: "You're The Bees Knees." Do bees have knees? Let's just try to imagine that one for a minute. 

Love In A Bag

Love in a bag.

In California a law just passed in which you have to buy bags (at the grocery store or the drugstore) if you don't have your own. My daughter, Abbey, and I sold "Love Resuable Bags" to raise money for the Fiji Kinde Project (which establishes kindergartens in Fiji). I've been using these bags for 3 years now. ( I'm a total trend setter:) I like "Love Reusable Bags" 'cause they come in all shapes and sizes, are durable, good looking and machine washable. 

Here's something really cool: If you buy one of the "Packables" (pictured below), Love Reusable Bags donates a backpack to a child in need through their "Give Back Sack" Program.

http://lovereusablebags.com

Spring is in the air!

It won't be long 'til Easter is here, so for the next few weeks Pickett's Pearls will be all about Spring/Easter decor and menu ideas.

If you have been following Pickett's Pearls for a while, then you know that I'm obsessed with making wreaths. I could buy them 'cause they are everywhere, but making them is much more fun not to mention a lot less expensive. Below are some spring wreath ideas. Here's what you do: first go to Michaels or some other craft store and get a grapevine wreath, lots of spring artificial flowers (I think the ones with tiny buds are the best), a glue gun with loads of glue sticks, and garden clippers (or very sharp scissors). Then you go about laying the flowers on the wreath so you can come up with your design. Finally you cut the flowers, stick them through the vines and glue the flowers down with a hot glue gun. Be careful. (Don't be like me and burn your fingers every time.)

My favorite wreaths are the hairy ones. I got the wreath below at CVS drug store for $14. It had about half of the flowers already. I just added to it! (Much of creativity is taking something and improving on it.) About 2 weeks before Easter I will add eggs, which of course, I got at Michael's. If I don't take the eggs off just after Easter, please yell at me.

Shop with Success

Do you often go to the grocery store and then come home only to find that you forgot something? (I know I do.) Do you also find yourself circling back to grab something from the first aisle you covered? (I'm guilty again.)

I have tailor-made a grocery list for our family that includes the things we buy over and over. Also on the list there is room for us to write in what we need.

In addition, the list follows the route I usually take in our grocery store. (Is that smart or what?)

Once I've typed the list out, I print it on brightly colored paper. That way my family sees it on the counter and can add to the list. Of course I've had to train them to use it. (The good news is "they can be taught.")

Happy Cooking and Shopping!

Deck Your Halls,Your Living Room, Your Dining Room....

Last year when I was putting away our Christmas decorations, I realized that they seemed a bit tired, so I vowed to revamp and refresh things this year.  I have had a very fun time.  Speaking of revamping, I have a friend (who will remain nameless) that really revamped her Christmas decorations one year. Instead of decorating her tree with all her traditional ornaments, she decorated her tree with nothing but purple and teal birds. Her grown-up children went bulistic. The revamping I was thinking of isn't quite that extreme. 

Here are a few ideas that may help you revamp this year:

Dress Up Your Tree 

One Christmas season I was at Juliet Kienhle's  from Newport Beach and I was struck by how beautiful her tree was. The thing that made it extra beautiful was the ribbon that she had swirled around it. I decided to swirl my tree that year too and have swirled every since.  Here's how you do it:

Step 1. Buy around 8 yards of very wide ribbon for a smaller tree and 10 yards for a larger tree. (I seem to keep learning the hard way that It's better to get too much than too little.)

Step 2. Put your lights on your tree. I have found the more lights the more beautiful. (Look at Juliet's.)

Step 3. Wrap the ribbon around the tree in a sort of candy cane pattern starting at the top (I tuck the beginning inside our big star)

Step 4. Add your ornaments.

Christmas Stars 

Recently I talked to my friend Lara Lanfried also from Newport Beach. She said that she puts autumn leaves on her tree and that they look beautiful with the white lights. Since I am such a gold and glittery type, I had to add gold and glitter. (Frequently, Linda, my favorite checker at the grocery store, asks me why I have paint on my hands and glitter all over my face? ) Anyway here's how you make them:

Step 1. Gather Autumn leaves and spray them with shellac to make sure they don't whither as much. (Let dry.)

Step. 2 Spray each leaf with either gold, rose gold or silver spray paint. Lara said this combo is really in. (Heck if I know.) Another option is spraying all the leaves one color. 

Step 3. While the spray paint is still wet, sprinkle the leaves with glitter. (I like the fine stuff.) 

Step 4.. Bundle 6 of the leaves starting with the smaller ones to make a beautiful star.  Using masking tape, tape the stems of the bundle where they meet the leaves and go down.

**These stars will look great on your Christmas tree, Christmas wreaths or even in flower arrangements.

Mirror Wreath

The other day I was looking at my my walls and noticed that I had nothing Christmasy on any one of them. I thought to myself, wreaths--that's the answer! By now you've probably gathered that I'm wreath crazy. Well the question was, what kind of wreath and where? I wanted to go with gold over my mantle. So here's what I did. 

Step 1. I went to my local craft store (Michael's) and  got a grapevine wreath

Step 2. I also bought some foliage that I could work with (As I have said in an earlier blog. it takes time to get just the right materials, so you may have to look and look till you get what you like.)

Step 3. I then arranged the foliage on the wreath, so I could plan where to put things. In my case I took the foliage apart and just used some. (See below.)

Step 4. I then sprayed some of the foliage gold. (In this case I sprayed my the leaves gold.)

Step 5. With a hot glue gun I glued the foliage onto the wreath.

Opt. Step 6. Finally I hammered a nail into the top of my mirror and hung the wreath with a  ribbon. Voila!

And Yet More Wreaths

The top of our piano is filled with Santa Clauses, so I made a red and green wreath for that spot. My daughter, Carly, said that my first design was kitch which I think means tacky, so I went about trying to come up with something else. I decided to wrap the whole wreath with a long red ribbon, then I added a bow. (See steps below for making the "perfect bow".  I really don't try to rhyme it just comes out that way.)

The Perfect Bow

Step 1. Get two kinds of wired ribbon and put one kind on top of the other.

Step 2. Begin making the bow by making loops on both sides and holding the center.

Step 3. Cut one type of ribbon and continue with one more loop on each side with the ribbon that's left.

Step 4. Using about 10 inches of ribbon tie the center of the bow tightly, then spread out the parts of the bow and fluff it up. There you have the perfect bow!

Happy Decorating!


Christmas Crafts and Other Stuff

As they say, there is a kid in all of us. So if you have kids around or just like to do kid stuff this post is for you!

Christmas Cookie Tricks

The hardest thing about making Christmas cookies is transferring the cookies to the cookie sheet. The cute little things seem to always lose their shape and sometimes even get beheaded.  I came up with a random way to avoid this! (Plus this method hardly makes any mess!)

You'll need:

A pkg. of sugar cookie mix and other ingredients required or pre-made cookie dough (my personal favorite).

A can of vanilla icing

Red, green and blue sprinkles

Christmas cookie cutters

Rolling pin and cookie sheet

Step 1.  Mix up the dough just as the directions say unless you are using pre-made dough.

Step 2. Put the dough in the freezer for about 20 min. This makes the dough easier to roll out. Use only a portion of dough at a time and keep the rest of it in the freezer. Form a ball with the dough. (You almost can't get the dough to cold.) If it freezes, just microwave it for a few seconds

Step 3.  Here's the biggy: Flip a cookie sheet over and roll the dough out onto the bottom of it rather than on a cutting board (see the picture above). This avoids any disfigurement that could happen when transferring the figures from a cutting board to a cookie sheet. 

Step 4. Another biggy: Using a cookie cutter, cut into the cold dough, then peel the dough off around each shape. (see ex. above) I also use a small metal spatula to remove cookies from the baking sheet when they are done.

Step 5. Follow the directions for baking on the package. Take cookies out while they are a bit soft. (I also use a small metal spatula to remove cookies from baking sheet).

Step 6. For any of the cookies where you want to use only sprinkles, sprinkle them before you bake.

Step 7. After the cookies are cooled, add icing and sprinkle with sprinkles (Very little clean-up).

Step 8. Eat them

Non- Edible Houses

Every year for years, our daughter, Abbey, who is 19 makes a ginger bread house. Here are a few tricks that she has learned over the years. First of all, we always get the the deluxe kit (of course at Michaels). (If you are new to this and don't want to play with the big boys, start with the regular kit.)

Trick 1. To keep the walls and roof from caving in, use a hot glue gun instead of icing.  Abbey says, " If we're not gonna eat the house anyway (the walls are literally hard as a rock) why not use a hot glue gun to keep the walls together?" Genius! It works beautifully! 

Trick 2. After squeezing some of the icing onto the roof, smooth it with a spackling knife.

Trick 3. Put some of the frosting in a separate plastic bag and cut a super small hole in one of the corners. Pressing out the frosting from the bag is great for smaller detail work.

Don't be too discouraged if your house doesn't look like Abbey's. I myself have less than zero fine motor skills and still have fun making one. (Notice there's no picture of mine.)

* My friend, Margy Coleman, of Chicago soaks the edges of their house in tea and "The walls stay together perfectly." Her girls like to eat theirs!

Easy Peasy Homemade Ornaments

Every kid likes to see an ornament they've made hanging on their Christmas tree. Here is an easy way to make them smile.. (Some steps are better for adults to do, like cutting out the ornament).

Step 1. Take some card board (I like to use the cardboard from the underside of a legal pad) and a cookie cutter (the simpler the better.) Trace the cookie cutter, and cut it out.

Step 2. After that punch a hole at the top of the cardboard "cookie" using a hole punch.

Step 3. Thoroughly cover the ornament with glue stick and sprinkle the ornament with lots glitter.  

Step 4. Repeat step 3 on the other side.

Step 5. Spray both sides with shellac to keep the gitter from coming off.

Step 6. Twist an ornament hook, so it will hang right. Hang it on your tree. Beautiful!

Light It Up

My kids and I used to do something really fun to make their rooms more Christmasee. We would put green and red light bulbs into their light fixtures. (I got them at the lighting store.) They just loved it! It gave their room a magical feel.

Happy Christmas Crafting!